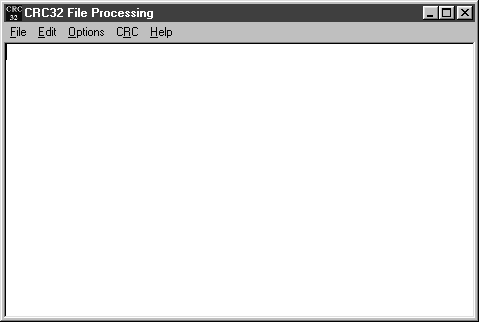
This is what the main program window looks like when you start the program:

The window is actually a text editor. This allows you to type any notes or comments for annotating your results. The editor uses a 12 point Courier font, which is easy to read. One important note about a 'hidden' feature: If you are displaying the output in the edit window, the output will be inserted at the current location of the cursor in the window. This allows you to enter some header text, press the RETURN key to get to the next line, and then have the CRC values be displayed at that point. This is an example. Notice that the cursor is now at the beginning of the second line:

When I process some files, the output will be inserted at the current location of the cursor. This is what it the edit window looks like after processing some files. Notice that the line "<- The cursor is now here" has been inserted ahead of the file processing output:
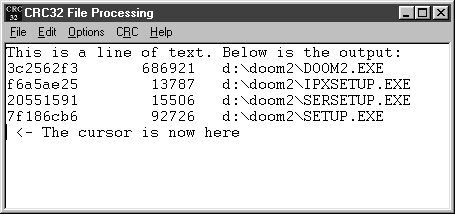
The three columns you see are respectively, the calculated 32-bit CRC value, the file's size in bytes and the filename including the full path. This is called the tabular format, which is discussed later.
CRC32 File Processing supports the 'drag and drop' functionality that you will see in most Windows programs. You can drag folders or files onto the text editor window, and the 32-bit CRC values will be calculated and displayed based on the settings that have been set up in the CRC settings dialog.
New
This will clear the entire contents of the text editor windowExit
This will exit the program. A 'settings.dat' file will be created in the directory the executable was run from, which stores the settings from the session.
Undo
This will undo the last change made in the text editor window.Cut
This will allow you to move the currently selected text to another location or remove it. This will be placed on the Windows system clipboard.Copy
This will copy the currently selected text to the Windows system clipboard.Paste
This will paste the current contents of the Windows system clipboard at the cursor's location in the text editor window.Select All
This will select the entire contents of the text editor window.
CRC Settings...
This will display the CRC settings dialog, discussed below.Load settings
This will load any saved CRC settings you selected from the settings.dat file located in the working directory that CRC32 File Processing was executed from.Save settings
This will save any CRC settings selected in the CRC settings dialog in a settings.dat file located in the working directory that CRC32 File Processing was executed from.Reset to defaults
This will reset any changed options in the CRC settings dialog to the defaults.
Begin processing
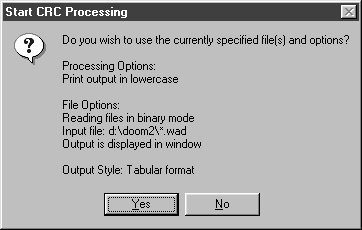
This will display the following dialog that displays the currently selected settings, including the input file(s) and any output file if specified. If you wish to continue, click on Yes. Otherwise, click on No, and you will be returned to the text editor window.
About...
This displays a simple 'About' box which gives some information about the program.
When you go to the Options menu and select CRC Settings, the following dialog will be displayed:
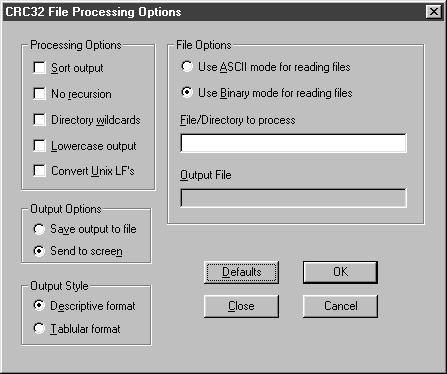
OK
This is will begin the CRC processing, using any options you selectedDefaults
This will reset all of the options in the settings dialog to the defaults.Cancel
This will close the dialog, discarding any changes you made.Close
This will close the dialog, and preserve any options you selected or changed. No CRC processing will take place.
Sort Output
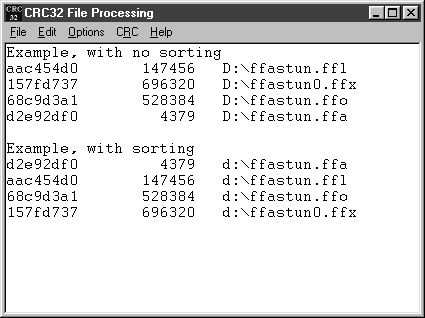
This option will sort the output by filename, which is useful if you are looking at a large number of files. When this option is selected, the 'Lowercase Output' option is disabled.Important note: When you sort, the output is always in lowercase and displayed in tabular format. Here's an example of how it works, showing the output with and without sorting:
No Recursion
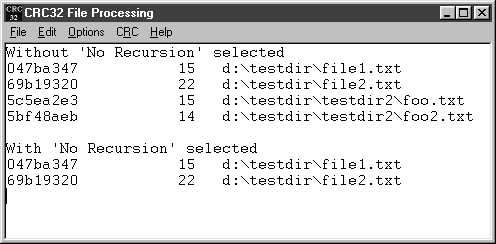
This is a useful option when when you want to process files that are in a directory, but you don't want the program to search through any existing subdirectories.This is an example, where a sample D:\TESTDIR directory has a subdirectory called TESTDIR2. We only wanted to process the files located in D:\TESTDIR, but the files in the TESTDIR2 subdirectory were included. When the option is enabled, only the files located in D:\TESTDIR are processed:
Important Note: If you are specifying a directory like "D:\", make sure that you place the slash character ("\") at the end of the filename. Otherwise, the program will think that you specifying a file instead of a directory, and no output will be displayed. Using this option will also disable the 'Directory Wildcards' option described below, as it will automatically recursion any subdirectories, if they are found.
Directory Wildcards
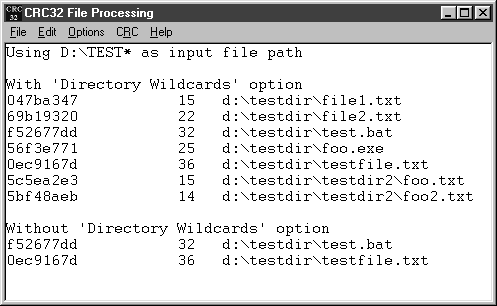
This option is useful if you want to process files in two or more directories that have a similar filename. All you have to do is to include a wildcard delimiter ('*') in the filename you enter in the input file edit box in the setting dialog. When you specify a wildcard, all of the files in the each subdirectory that matches the filename specified will be processed.This is an example, where we are using the input filename D:\TEST*. Without the option enabled, only files (and any directories) that matched the TEST* wildcard specification were processed. When the option is enabled, then all files (and any directories) in the D:\TESTDIR directory were processed.
Lowercase output
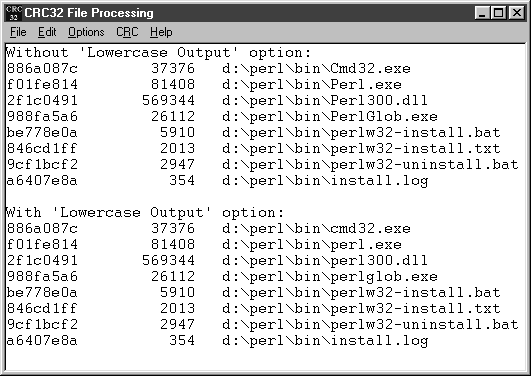
This option will display all of the output in lowercase format. Many file and directory names use a combination of uppercase and lowercase characters, and this option makes the output much easier to read. This is a example, showing the differences with and without lowercase:
Convert Unix LF's
This option will convert the Unix LF end of line character in text files to the CR-LF character used in MS-DOS. This feature is very useful if you are comparing the files that are from a CD image against the installed image. Selecting this option will disable the 'Use ASCII mode for reading files' option under File Options.If the CD was created on a Unix-based computer system, the carriage return characters in text files will be different from those on MS-DOS based computer systems. On Unix, a return is represented as a single LF. On MS-DOS, a return is represented as two characters, CR-LF. When you read the MS-DOS file, the two characters are read as a single character. This option, which is only valid for ASCII files, will compensate for the CR-LF differences.
Here is an example showing how this feature works. The file UNIXFILE.TXT is from a CD that was created on a Unix-based computer system. The file DOSFILE.TXT is the installed version of the same file, and is 9 bytes larger because of the additional 9 CR characters that are included with each end of line. Otherwise, the two files are identical.
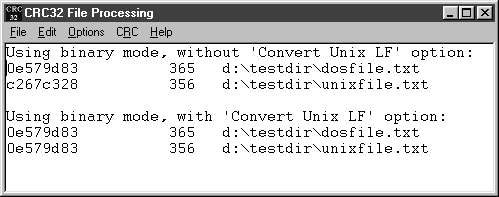
The two CRC values for the files are different. This is caused by the differences between the CR-LF and LF. When the 'Convert Unix LF's' option is enabled, the LF characters are converted into a CR-LF sequence, and then resulting CRC values for the two files match. Although the Unix LF characters are converted, notice that the reported file size for UNIXFILE.TXT remains the same. This is done on purpose to avoid any confusion when comparing the files. Only only file size that is displayed is the file size as reported by the file system.
Save Output to File
This option will redirect the output to a specified output filename. When you click on this radio button, the text edit box for the output filename will be enabled. If you select this option and don't enter an output filename, the output will be displayed in the text editor window instead.Send to Screen
This option will display the output in the text edit window. This is the default option.
Descriptive format
The output is displayed on three lines, which is useful for looking at the results for a individual files or small groups of files. This is the default option. This is displayed on three lines of text.Tabular format
This displays the output in a three column tabular format, which makes for easy reading when comparing large groups of files or directories. The 32-bit CRC value is displayed, followed by the file size and the filename including the full filepath.Important Note: If you are using the 'Sort Output' option, the output is always in tabular format and displayed in lowercase. The 'Descriptive Format' option will be disabled.
Here is a sample of each output style:

Use ASCII Mode for Reading Files
This option will read the specified input file(s) using ASCII mode, and is only valid for test files. If you attempt to read a binary file using ASCII mode, the program will automatically detect this and use the binary mode. This option is disabled when using the 'Convert Unix LF's' option.Use Binary Mode for Reading Files
This will read the specified input file(s) using binary mode. This is the default setting. If you are unsure which option to use for reading your files, use this option.
File/Directory to process
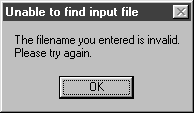
This edit box allows you to specify the file(s)/directory to process. You can use wildcards for filenames and directories. You can also drag & drop a file/folder onto the CRC settings dialog, and the edit box will be updated. The edit box will only accept a single file, so if you drag a group of three files onto the dialog, only the first file will be displayed in the window.The filename is validated before any processing continues. If the input file cant be found, the following message box will appear, and you will be returned to the text edit box when you click on OK:
Output File
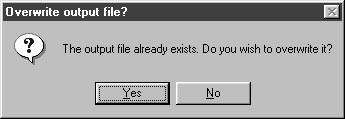
This edit box allows you to specify the file you wish to send the output to. If no output file is specified, then the output will be displayed in the edit window. You must click on the 'Send output to file' radio button in order to save the output to a file.If the specified output file already exists, you will be prompted if you wish to overwrite it. Clicking on No will return you to the output file text edit box.
If the output file can't be created for some reason, the following message box will appear. You will be returned to the output file text edit box.
